Desktop PC Memory Installation Guide
Adding extra memory is a good way to enhance the performance of your PC, and is a relatively easy upgrade to perform.
Before starting, ensure that you have obtained the correct memory part for your PC - not all machines will work with all types, even if they physically fit.
Electronic components are very sensitive to damage through electrostatic discharge. So before you touch any electronic components, touch an unpainted, grounded metal object to discharge any static electricity stored on your clothing or body. The use of an anti-static wrist-band is recommended for the best protection.
- Shut down the machine, and switch the computer's power switch to the "off" position.
- Remove the AC power cord.
- Remove the system cover following the instructions in the owner's manual.
 Locate the existing memory on the main board. Note the the memory devices are held by clips at either end of the connector.
 - If you need to remove a memory device, release the two clips and then lift the device out. Handle the device by its edges and avoid touching the gold plated connectors. Memory devices should always be stored in an antistatic bag.
- To insert a new device, remove it carefully from the protective packaging and line up the notches in the connector strip with the corrisponding keys in the socket on the motherboard. Press the device down into the connector, making sure that it is firmly seated. When correctly positioned, the ejector tabs should snap into position, locating into the notches on the side of the device.
- Once all the required memory devices have been installed, replace the covers and reconnect the machine.
- When the machine is restarted, it should recognise the new memory and make any adjustments required. If any manual setup is needed, follow any instructions detailed in the maunfacturers handbook.
Virtual Memory - WindowsXP
 WindowsXP users may need to adjust the system's virtual memory settings:
- In the Control Panel, select 'Performance and Maintenance', followed by 'System'.
- On the 'Advanced' tab, click the settings button in the 'Performance' section.
- The 'performance Options' dialogue will appear - click on the 'Advanced' tab.
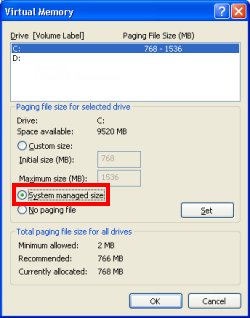
- In the 'Virtual Memory' section, click 'Change'.
- Ensure that the 'System Managed Size' option is selected.
- Click 'OK' on each of the dialogues to get back to the Control Panel.
email : support@custom-internet.co.uk